
To turn a long video into shorts with AI, import the recording, specify the moments and format you want, ask for separate editable clips, then review the cuts, framing, and captions before exporting. ChatCut’s AI video editor supports a conversation alongside a multi-track timeline, so you can keep revising the result.
A useful short delivers one complete point. An interview answer, a tutorial step, or a story can work without the surrounding recording when the opening gives enough context and the ending completes the thought. Start with that editorial goal rather than a promise that every source will yield the same number of clips.
Watch the real long-video-to-shorts demo
Watch the 36-second editable-shorts demo, first published June 21, 2026 on @chatcutapp. The post describes turning one video into five editable clips. In the recording, you can see separate clip tabs, the speech transcript, a vertical preview, and requests to revise the captions.
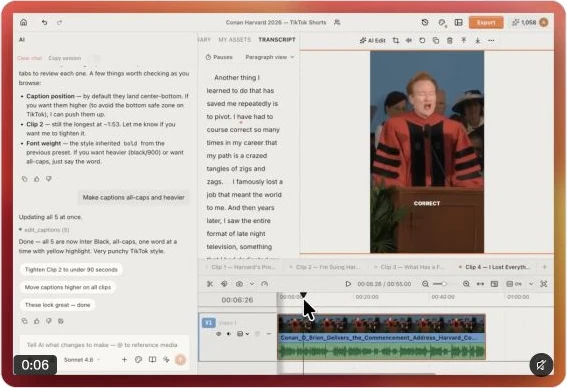
The recording illustrates the editing workflow; its 36-second duration is not the processing time for the source video. Uploading, transcription, agent work, revisions, and export depend on the recording and the requested edits.
For another example, see the podcast-to-shorts screen recording and the ChatGPT editing project with three captioned highlights.
How to turn a long video into shorts in ChatCut
1. Import the recording and identify the source
Open My Assets → Upload → Files and choose your recording. Wait for processing to finish, then place the source on a timeline or reference the asset in your request. A file attached to a chat message is context; it is not automatically inserted into the edit. The My Assets guide explains the difference.
For speech-led footage, check the transcript before choosing highlights. Correct names, numbers, and any words that change the meaning. If the project contains several recordings, identify the intended source with an @ reference instead of leaving the agent to guess.
2. Give the agent a clipping brief
Specify the audience, clip count, approximate length, aspect ratio, and what each clip should communicate. Tell the agent which ideas must stay intact and whether you want captions, music, or supporting visuals.
Try this brief, replacing @interview with your source reference:
Find up to five standalone highlights in @interview for viewers who have
not watched the full interview. Aim for 30–60 seconds each and a 9:16 frame.
Choose a clear opening and keep the complete answer, including important
qualifications. Propose the moments before cutting. Put each approved short
on its own editable timeline and add readable captions. Do not add music yet.
“Up to five” leaves room for a source that contains fewer strong moments. For a tutorial, ask for one complete step per clip. For a webinar, ask for answers to specific audience questions. The Talking Head Edit documentation covers prompts for speech cleanup and vertical shorts.
3. Review the cuts and vertical framing
Play every proposed short from beginning to end. Check that the first sentence makes sense without the full recording, the final sentence finishes the point, and removed pauses have not made the delivery feel rushed.
Keep the speaker or important visual in frame. A screen recording may need a different crop from a close-up interview: readable interface text can matter more than filling a vertical canvas. Review the picture instead of assuming the requested aspect ratio produces a good crop.
Use the Transcript panel to navigate speech and remove unwanted passages. Deleting transcript words cuts their corresponding time range from the selected track; review the result after each substantive change. You can also ask for a targeted revision:
Revise only the second short. Start at the sentence that explains the mistake,
keep the full example and conclusion, and remove the repeated introduction.
Leave the other timelines unchanged.
4. Revise captions and add supporting visuals
Open the Captions control to choose a style, then check spelling, timing, contrast, and position against the actual footage. Preview the short at phone size. Captions should stay legible without hiding the speaker’s face or important screen content.
The public demo includes caption-revision requests. A similar instruction for your own edit could be:
Make the captions heavier and move them higher in the frame. Keep them
inside the safe area and do not cover the speaker's face. Apply the same
style to these shorts, then let me review each one.
Add B-roll when it clarifies the point or covers a distracting jump cut. You can use imported footage or create a new shot with ChatCut’s AI video generator. Review generated visuals for accuracy before using them to illustrate a factual statement. Music and motion graphics are optional finishing choices; they do not replace a clear cut.
5. Export each finished timeline
Select the intended short’s timeline, open Export → Video, and choose the format, resolution, frame rate, and full timeline or marked zone. Repeat for the remaining shorts, then play the exported files to check picture, sound, and captions.
See Export Video, Audio, and Subtitles for the current controls. If you need to continue editing in another application, read the Premiere / DaVinci XML export guide and check the destination’s supported features.
What makes a short worth keeping?
Use this review table before publishing:
| Check | Keep the clip when… | Revise it when… |
|---|---|---|
| Opening | The viewer knows the subject immediately. | It starts with an unexplained “this” or “that.” |
| Complete idea | The example and conclusion survive the cut. | The claim loses an important qualification. |
| Framing | Faces, demonstrations, or interface details are readable. | The vertical crop hides the subject. |
| Captions | Words are correct, timed, and easy to read. | Text overlaps essential visuals or misstates the speech. |
| Sound | Speech is clear throughout. | A cut clips a word or music competes with dialogue. |
For source footage with little speech, explain the visual moments you want and review them in the Viewer. A transcript alone cannot tell you whether an action sequence or screen demonstration communicates the intended point.
FAQ: turning long videos into shorts
Can AI turn one long video into several editable shorts?
Yes. ChatCut can create short versions and alternate timelines from longer footage. Ask for separate editable timelines, then review each cut before exporting. The linked public demo shows this approach with clip tabs, a transcript, and captioned vertical previews.
How long does the process take?
There is no fixed completion time for every recording. Source length, upload and transcription state, edit complexity, revisions, and export affect the total. The 36-second demo is a screen recording of the workflow, not a speed benchmark.
Can I change the clips after AI creates them?
Yes. Revise the timeline, edit speech through the transcript, or ask the agent to change a specific short. Play the result again after changing clip boundaries or captions.
Should I use an AI video editor or an AI video generator?
Use an editor to repurpose an existing recording. Use generation when you need new footage, such as a supporting B-roll shot. ChatCut supports both; the editor-versus-generator guide explains how they fit into one project.
Can I import a video from a URL?
Local files can be imported through My Assets. The current My Assets documentation lists Upload → URL for Desktop 0.4.21 or later, with compatible quality and media options. Check the import result before starting the edit.
Open ChatCut with one recording and a clear clipping brief. Start with a few strong moments, keep the timelines editable, and finish each short with a deliberate review.